Introduction
A quarter round is a trim used to cover the joint between two surfaces and hide the gap between them, most often at 90-degree angles. They come in different materials such as metal or plastic and can be nailed with nails or adhesive. Quarter round is commonly found in bathrooms where it is installed around tubs and showers to prevent water from damaging the surrounding flooring.
A quarter of rounds run along the sides of your bathtub and acts as a bumper guard for you when you take a shower or bathe. It prevents damage to your bathtub, walls, and even floors throughout your bathroom, by stopping any leaks from running down further than necessary. This article will discuss “How to Attach Quarter Round to Bathtub.” So let us get started.
A Detailed Stepwsie Guide on How to Attach Quarter Round to Bathtub
Step One:
The first step is to get the piece of quarter-round. Then, measure it so that you will attach it to the base of your bathtub. Ensure that its length and width are correct for your bathtub, or else it may not look good. It is always advised to cut any pieces of wood longer than what you need because they can always be trimmed later on if required.
You should also consider where exactly you want this quarter round attached? The edges, which are regarded as outside edges, should not hold a lot of weight to remain stable. Do not put much pressure on these areas, or they will break sooner or later. In addition, make sure that all the pieces of wood fit together correctly. You may cut any excess pieces or discard them if they don’t seem to work right.
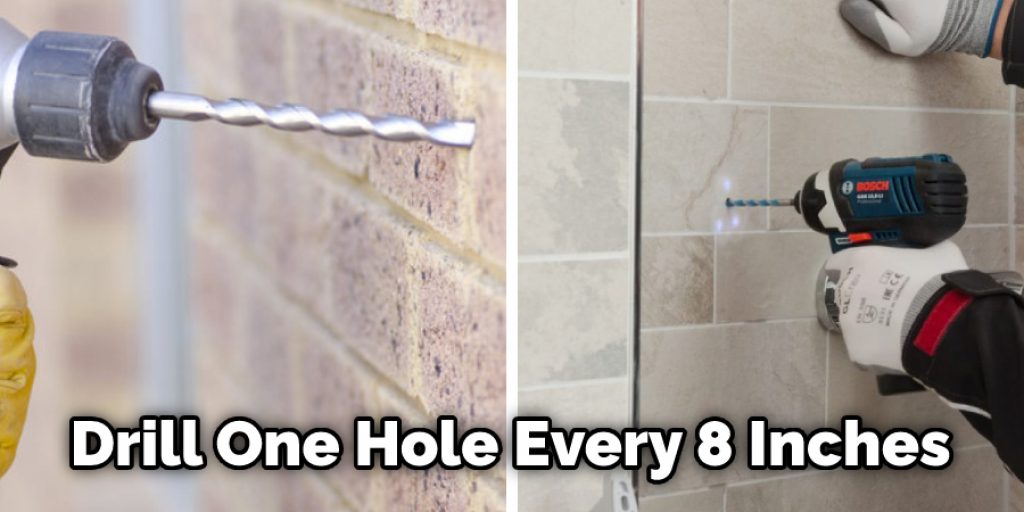
Step Two:
The next step is to attach the quarter round to your bathtub by drilling pilot holes and to insert screws such as cap-head countersunk screws into these pilot holes. You can also use nails, but this will take a lot longer than using screws. Using screws ensures that it will be fixed stronger and more stably than using pins.
It is recommended to drill one hole every 8 inches (20 cm). If you do not want screw heads on top of your quarter round, make sure that you face them towards the back or inside your piece of wood so that they aren’t readily noticeable.
Step Three:
The third step is to fill the holes with wood filler or putty to make them easier on the eye and blend appropriately with the quarter round. However, you have to remember that it is best to wait for a couple of hours before doing this step because some wood fillers require time to dry. Also, the material will not dry if you cover it up too early with putty.
Step Four:
The fourth step is sanding down any leftover pieces of wood filler or putty using sandpaper until it’s smooth enough. If your bathtub has wallpaper, make sure you do not get rid of any leftover pieces of wallpaper during this process, as it may result in damaging your wallpaper for good.
Step Five:
The fifth step is to apply primer or paint, depending on your preference. Again, you can choose any color you like for this part as it will not affect the performance of your quarter round at all. Just make sure that it looks nice and attractive to you! After applying the paint, allow plenty of time (at least 24 hours) before exposing it to water so that the painting job doesn’t peel off right away once exposed to water.
You can check it to Use Bath Bombs Without Bathtub
Step Six:
The sixth step is polishing up your bathtub using wax, which protects your bathtub from becoming damaged early due to moisture or other reasons. Again, you can do this by hand or with a mechanical buffer to achieve an even sheen. However, if you do it by hand, make sure you sleep or rest plenty of time before doing it, as it can be strenuous.
Step Seven:
The seventh step is to attach the quarter-round to your bathtub using wood glue if you do not want to use screws. In this case, allow extra drying time for the bond as it will take longer than painting or waxing to dry up completely. It would help if you also drilled holes into the end grains instead of through them to hold tightly onto the tub surface without coming loose due to natural movements in some instances, depending on how often your bathtub gets moved around. Attaching quarter rounds with wood glue is ideal when connecting them on top of ceramic tiles since these materials are usually porous and can absorb the wood glue pretty quickly.
You can check it to Remove Bathtub Sticker Residue
Precautions While Attaching Quarter Round to Bathtub
1. Quarter round is the strip of wood installed near the bottom edge of a bathtub, wall, or threshold.
2. When nailing new quarter round onto wall studs, use construction adhesive that works best for drywall installation to secure it firmly into place along with finish nails. If you’re using liquid nails, then put them on both the backside of the quarter round and the surface that will be making contact with the bathtub.
3. A few tips before you start: obliterate old quarter round before installing new one; make sure bathtub is clean and dry before beginning installation; use level to ensure that quarter round is installed straight; if you’re using adhesive, give it time to cure completely (at least 24 hours) before using the tub.
Conclusion
I hope this article has benefited from learning how to attach quarter round to bathtub. Ensure all the precautions while performing the process. Thank you and have a nice day!


