Mirrors are a staple of any bathroom. They give the room more light and make it feel larger. But, if you want to change up your look or have an extra project on your hands, you can etch a mirror with ease using only a Dremel. This is great for making custom mirrors for dark rooms or adding some design elements to something plain!

If you are looking for an inexpensive way to make your bathroom look more luxurious, then this blog post is perfect for you. Mirror etching is a quick and easy DIY project that will impress guests and family members alike. The information below will be helpful to those who want to learn how to etch a mirror with a Dremel.
Step to Follow on How to Etch a Mirror With a Dremel
Step One: Determine What to Etch
The first step to etching a mirror with a Dremel tool is to determine what you want etched. You can carve just about anything, but the most common designs are monograms and quotations. It’s also possible to purchase stencils specifically for this purpose.
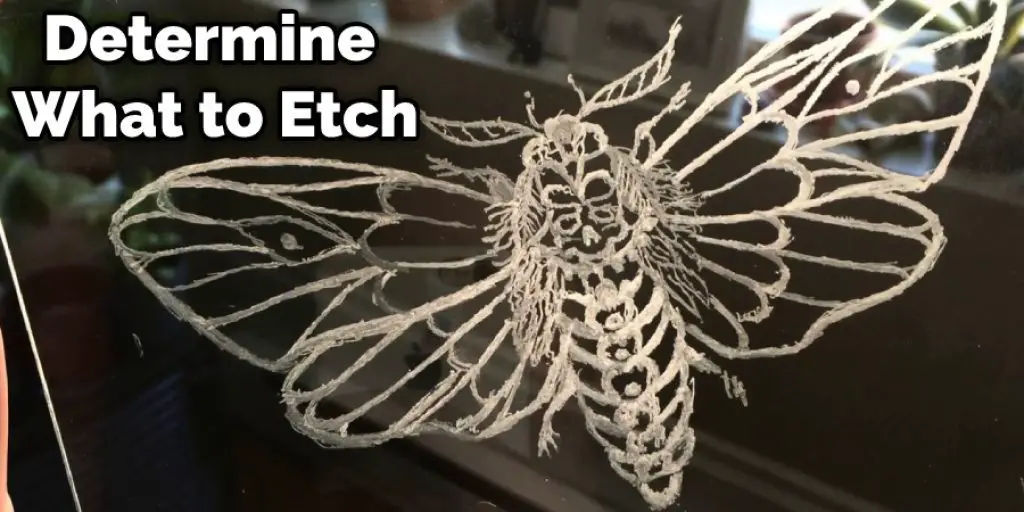
So, you’ve decided what to etch into your mirror. Now, you need to find an appropriate-sized mirror. If you’re purchasing one for this purpose, make sure it’s at least 8 inches by 10 inches. This will give you plenty of space to etch whatever design you want.
Step Two: Prepare the Mirror
Before you etch anything into your mirror, it needs to be prepared. First, clean the surface thoroughly with water and dish soap. Next, use a sponge or rag dampened with the soap solution to remove all dirt and grease from the glass. Rinse thoroughly to make sure no soap residue is left on the mirror’s surface.
Next, you need to roughen the glass for better adhesion of the acid. Then, use a solution of one part water and two parts muriatic acid available at most hardware stores to cover the mirror completely. Allow the acid to soak into the glass for about ten minutes.
Step Three: Brush Off the Acid Residue
Once ten minutes have passed, use a sponge or rag and water to remove all acid residue from the mirror’s surface. Be very careful not to get any water behind the mirror, so it doesn’t get damaged. Once the acid has been thoroughly removed, use a paper towel or other absorbent cloth to soak up any water still on the glass.
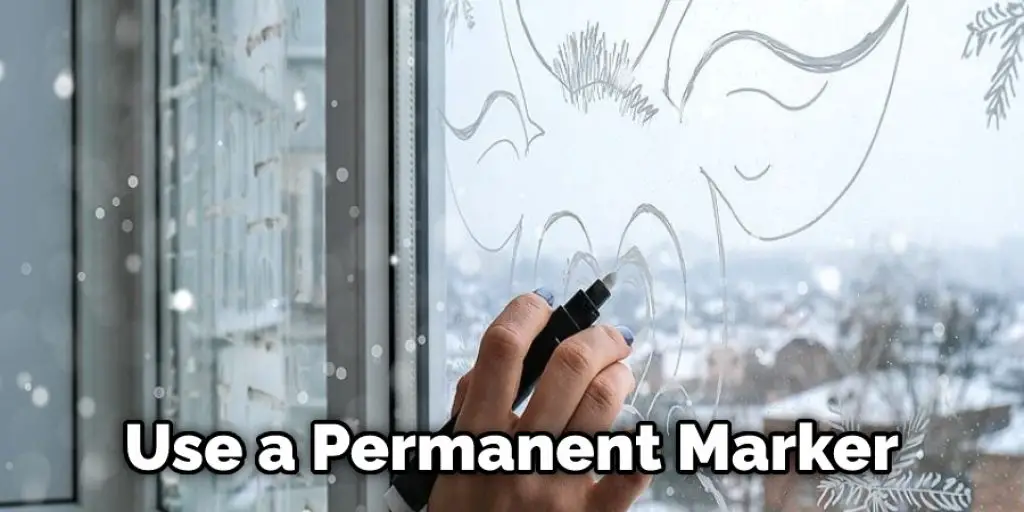
Once the mirror is dry, it’s time to design your etching. If you’re not confident in your ability to create your design, stencils are available at most craft stores for purchase. Otherwise, use graphite paper and a pencil to draw your design on the glass. Ensure the design is facing the way you want it outward because it will be stained that way after etching.
Step Four: Put Your Design Into Action
Once you’ve finished drawing your design, use a permanent marker to trace overall lines. Take care not to let ink go behind the glass. If it does, wipe the excess ink with a cloth dampened in rubbing alcohol. Next, tape your design over the etched area of the mirror and cover it with black construction paper to block any unwanted light from reaching it as you work.
Now you’re ready actually to etch your mirror. Remove the construction paper from the design and put on gloves to protect your hands. Fill a small plastic tray with 2 ounces of hydrofluoric acid available at hardware stores mixed with 1 ounce of water. Use an eyedropper to place drops onto the surface of the mirror where you want it etched.
Step Five: Watch It Work
The time it takes for the acid to etch into the mirror will vary depending on how deep an etching you’re trying to achieve. Small designs like initials take around three minutes, but more detailed ones can take upwards of 20 minutes.
Once all of your design is etched onto the glass, pour water over it to neutralize it and prevent further etching. Follow the water with a baking soda cleanser and paper towels to remove any acid residue from the glass.
Step Six: Clean Up
Now that you’ve etched your mirror, it’s time for cleanup. First, throw away the plastic tray and construction paper to keep it from corroding in a landfill. Do not pour any leftover acid down a drain because it will corrode through them quickly and damage the below-mentioned pipes.
Finally, please take all of your supplies and discard them properly. You can do this by returning them to the hardware store where you got them or taking them to a hazardous waste drop-off site. Etching mirrors using an acid etching process will create beautiful designs that leave anyone envious of your craftsmanship.
Step Seven: Hang It Up
Now that you’ve finished etching find a nice spot for your newly designed mirror. A bathroom, bedroom, or living room is the perfect place to hang it up so you can admire your excellent craftsmanship every day. Just make sure the area is somewhere safe and out of reach from children and pets.
Now that you know how to etch a mirror with a Dremel, it should be easy to start designing your mirrors and making memories that will last lifetimes. You can hang these up in your home or give them as presents so everyone can admire their beauty and creativity.
Step Eight: Enjoy Your Work
You worked hard on your mirror, and it should be admired by anyone that comes into contact with it. So, once you finish etching, fill your home and life with these beautiful pieces of glass to take pride in them every day. They’re easy to make and will bring a smile to everyone’s face once they see what you’ve created.

Frequently Asked Question
What Do I Need for Mirror Etching?
Mirror etching is a process that uses an acid to remove the metal from a substrate. A substance such as hydrofluoric acid, nitric acid, or phosphoric acid is used to dissolve the surface of the substrate. The result is an etched pattern on the substrate where it has been removed.
Depending on what material you are etching and how deep you want your pattern, different acids can be used. Some acids like hydrofluoric can only be applied in specific concentrations which means that if too much of it is used then the whole thing will be ruined and not useful anymore.
What Happens if You Leave Etching Cream on Too Long?
Etching cream is a product that can be used to create patterns on your skin. However, if you leave it on for too long, the skin can become irritated and the effects of the cream will not be as visible.
If you do leave it on for too long, then there are two things that could happen:
- The effects of the cream may still be visible but in a more subtle way because your skin has been irritated by the product, and any pigment left over will not show up as well as they would have had you not left it on for so long.
- The effect of the cream may disappear completely and even if it does stay on longer than necessary, there will be no pigment present because your skin has been irritated by it or something else like soap/shampoo or an ingredient in your cleanser caused irritation which prevents pigment from being applied to your skin.
Can You Use Vinyl for Glass Etching?
Vinyl is a popular material that is used for making t-shirts, shoes, and other various clothing items. However, it can also be used to create some pretty amazing works of art.
Yes, you can use vinyl for glass etching because vinyl has a lot of similarities with glass in terms of texture and hardness. In addition to this, vinyl does not require the application of any additional materials such as paint or resin to create your artwork.
Can You Add Color to Etching Cream?
There are different types of etching cream, and one of them is the water-based type. This type of etching cream is more suitable for people who have a lot of patience and want to do very detailed work.
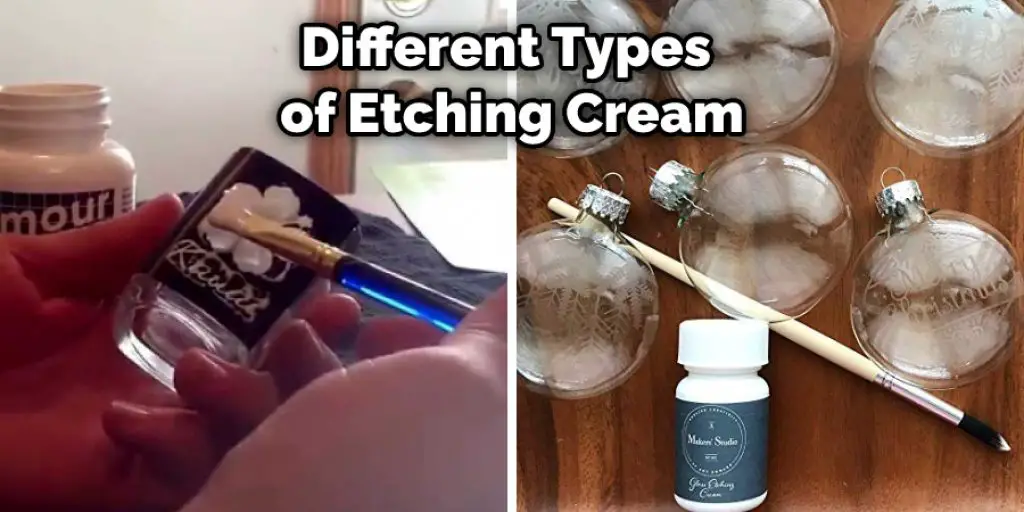
The other type is the solvent-based type which can be used on almost any surface and has less chance of damaging the surface, unlike the water-based type.
Conclusion
After reading our blog post on how to etch a mirror with a Dremel, you should now be able to save money by making your mirrors. With just some simple instructions and the right tools, you can create an inexpensive DIY project that will impress all of your friends.
If this sounds like something that could be up your alley, you should definitely try it out. It’s a simple process that anyone can do in just a few steps, so you have nothing to lose.
You can also check it out: Diy Project – Create a Frosted Glass Yourself at Home


