Learning how to remove composite deck screws is a crucial skill for every homeowner. Composite decks are made of wood and plastic combined, which means they can be more challenging to repair than traditional wooden ones.
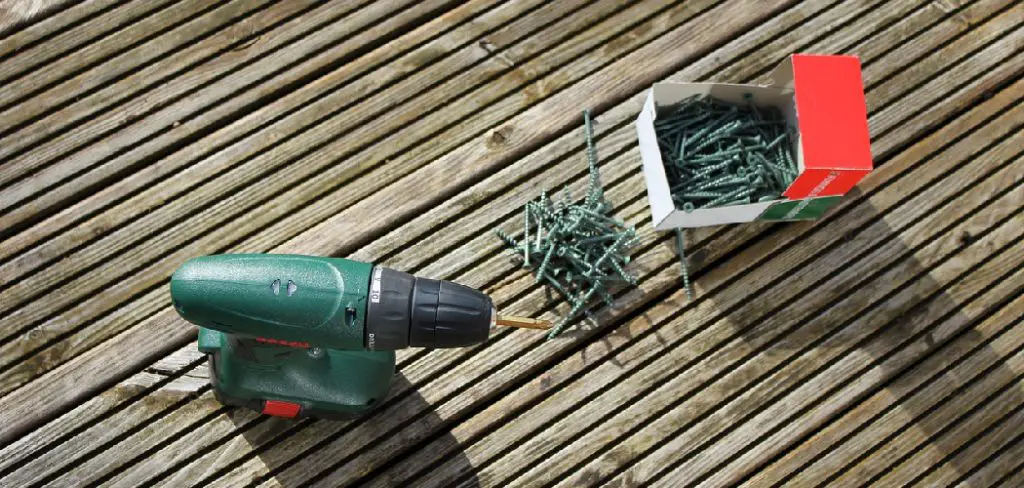
The good news is that there are ways you can get the job done without too much hassle. The task you need to accomplish is to drill the screws out from the composite deck. A common mistake people make when removing a screw from a composite deck is using a Philips head or flat screwdriver.
Step to Follow on How to Remove Composite Deck Screws
Step One: Preparation
If the screws are badly corroded, a high-speed rotary tool with a wire wheel will be needed to remove all of the rust from them. If they have just been driven in without being prepped, take the time now to remove all of the dirt and debris from them before proceeding further.
It would help if you also removed any old, loose paint from the surface before you begin drilling. This can be done with sandpaper and a wire brush attachment on a drill or by taking the time to scrape off any uneven bits of paint that may have been applied haphazardly.
Step Two: Drill Pilot Holes
Use a drill bit that is slightly smaller than the head of the screw to drill pilot holes into each of the screws. This helps guide the bit as you are drilling, preventing it from sliding around erratically if it happens to encounter any resistance or unevenness in your decking surface.
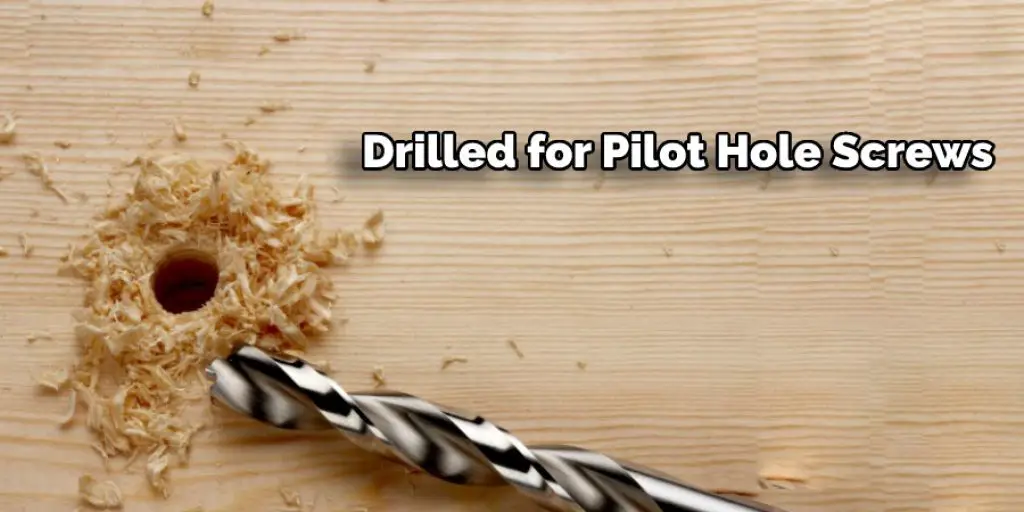
You want to make sure that you can see enough metal sticking out of the wood for your tools to be able to grab onto. If there is too much metal sticking out for you to get a solid handle on the head, angle it so that it has a bit less protruding from the wood.
Step Three: Drill the Screws
This will require a special bit to drive into your decking material, as it should be made of harder metal than other types of wood screws. Be sure to purchase the correct type and size for your deck before you begin drilling. If using a rotary tool, place the tip against the center of the screw head and apply a good amount of pressure to drive it in.
You should take the time after each screw has been drilled in to go back and use a wire brush attachment on your drill to clean any debris from the holes, just in case you could not get all of it when you initially drilled them. If using a rotary tool, this is not necessary as the bit will do it.
Step Four: Remove the Screws
You will need to use a more significant bit for this part. The best kind is a screw extractor, as it has a spiral blade that quickly and easily cuts into the head of the screw without harming your decking surface. Once you have applied pressure to the end of the tool, twist it back and forth until you feel the blade starting to catch in the screw head.
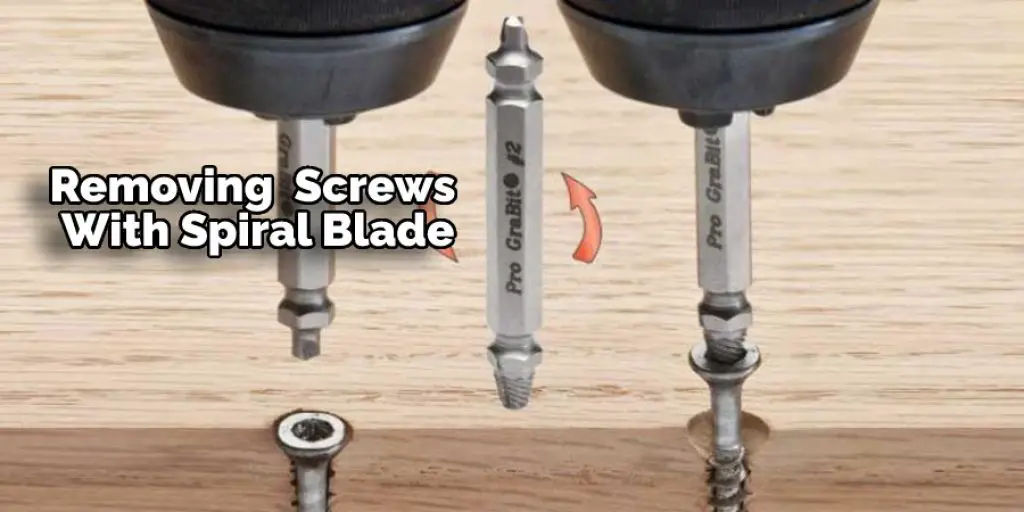
Once you begin to feel the blade catching, continue twisting it back and forth until you can pull up on the handle of your extractor without it coming out of the wood. Once you do this successfully, keep tightening your grip and pull firmly upwards to remove both the drill bit and screw.
Step Five: Prevent Future Damage
If you are using composite decking material, there is no need to worry about removing the screws. However, if you run into this problem with another type of wood decking, be sure always to use screws that are meant specifically for it. If you don’t want to remove them later, use decking screws instead of wood screws.
If you end up not being able to remove the screws from your deck completely, then replace them with a screw or two that is a size bigger and drill into it at an angle so that it catches more of the head of the screw. This will prevent another deck screw from slipping out of it. In addition, this will help in how to remove composite deck screws.
Step Six: Fill in the Holes
If you can still see the screw head protruding out of your decking material, then this step will require an extra set of hands. You can use either a gel or powder composite wood filler for this job. Apply some to the back of one hand and mix it with water using a piece of scrap lumber.
Use the flat side of the piece of lumber to smooth it over the holes so that it is as level as possible. If you are using a powder, then pour it into a small bowl and add only a tiny bit of water at a time until you have a spreadable mixture. If you use too much water, it will lose its adhesive properties and not act as effectively.
Step Seven: Sand and Stain/Paint the Decking
Use a palm sander with course-grit sandpaper to smooth out any imperfections in the filler. Then, use a paint stirrer attached to your power drill and not turned on to smooth it over and remove it from any hard-to-reach spots that the real sander can’t get to.
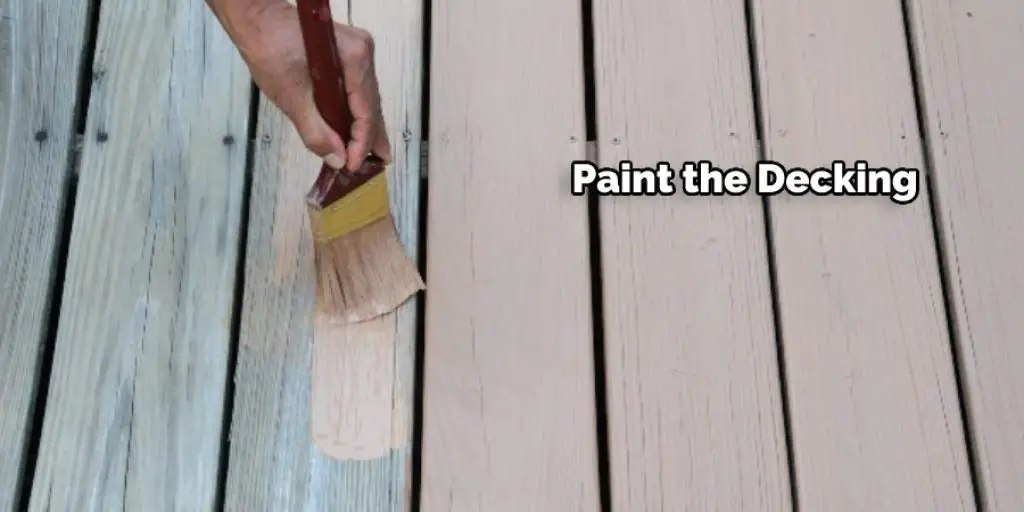
Once you are satisfied with the consistency of your filler, let it dry completely and then sand over it again with a fine-grit sandpaper. Stain or paint using either a brush or roller for the best results. If using stain, be sure to wear protective gloves as they can permanently tint hands black if they come into contact with it.
You Can Check It Out to Remove Deck Boards With Nails Without Damage
Frequently Asked Questions
What Screws for Composite Decking?
Deck screws play an important role in the installation and maintenance of composite decks. They are used to attach decking boards together, and they come in a variety of styles and lengths depending on your specific needs.
There are self-tapping screws that use screw heads that automatically drive into the decking board as you tighten them. This prevents damage to the wood while securing the decking board in place. There are also Lloyd’s ties that use sticky tabs at each end of the tie wire which help hold down retractable roof systems or composite decks securely during construction or repairs.
Can You Use Regular Deck Screws for Composite Decking?
There is some debate among experts as to whether or not composite decking can be installed using regular deck screws. The main reasons for this are the potential for damage to the composite material and the increased chance of screw pull-through. While screw pull-through is not necessarily a bad thing, it can lead to wobbles in the deck and decreased lifespan. If you’re unsure about whether or not regular deck screws can be used on composite decking, it’s recommended that you consult with a professional contractor.
Should I Use Hidden Fasteners on Composite Decking?
While it is always a good idea to use safe and reliable fasteners on composite decking, there is no need to use hidden fasteners. This type of fastener can cause damage to the wood grain and may not be as durable as other types of fasteners.
Why Do Composite Screws Have Reverse Threads?
Composite screws have reverse threads because they are designed to attach parts that are difficult to screw together, such as a metal frame and a plastic skin. The screw’s threads go in the opposite direction of the materials it is attaching, so the screws can grip the frame while the skin is pulled tight.
Should Composite Deck Screws Be Flush?
When composites are installed, it is common to use composite deck screws. However, some homeowners believe that these screws should be flush with the deck surface so they do not create an unsightly appearance. The truth is that there is no definitive answer, and it largely depends on personal preferences.
Some people feel that flush-mounted composite deck screws look more aesthetically pleasing and blend in better with the surrounding architecture. Others feel that a slightly raised screw helps to V-notch the edge of the deck for added stability. Ultimately, it’s up to you as the homeowner to decide whether or not you want flush-mounted composite deck screws. Just make sure your installation looks good from all angles!
Conclusion
The best way to remove the head of a screw is by using an electric drill. First, put on safety goggles and gloves, then place the screws in your vice grip. Apply pressure slowly until you break through the metal that holds it together at one end. Repeat this process with all four ends of the screw until you can pull out just enough so that you can grab hold of them easily with pliers or vice grips.
Once they are loosened up, please take off your protective gear and unscrew each piece carefully before removing them completely from their original location. The conclusion paragraph is informative and provides information on how to remove composite deck screws.
Check it out to learn – How to Install Lag Bolts on a Deck


