Introduction
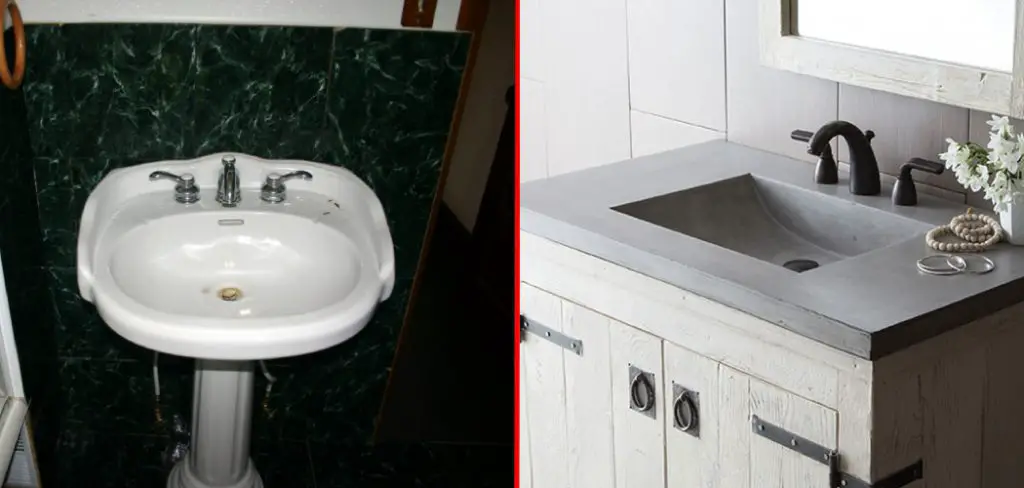
A pedestal sink is a sink located on an open base or pedestal rather than being built into or attached to the countertop. The pedestal that supports this basin can be either free-standing or built into cabinetry that conceals all but the front legs of the unit; in either case, plumbing connections (faucet and drain) are generally integrated with the structure. A vanity sink is a sink that is designed for installation into a vanity (also called a countertop) and comes in many different styles and materials. It’s common to replace an outdated pedestal sink with a vanity top-mount sink, but not all sinks are compatible. For this reason, this article will explain how to replace a pedestal sink with a vanity. So let us get into the core discussion.
A Detailed Stepwise Guide on How to Replace a Pedestal Sink With a Vanity
Here we will discuss all the steps involved in replacing a pedestal sink with a vanity and show you how to do it. So follow these How-To steps below:
Step 1:
The first thing that needs to be done is remove the old pedestal sink from its place. Check if there is any water supply line running behind and disconnect them if present. Next, remove faucet handles and cover plates, and save them for reattachment later. Ensure that everything has been disconnected before moving on to remove the sink since once removed, it cannot be reinstalled again where water supply lines might hinder installation.

Step 2:
The first thing after the sink is removed is to make a mark on the wall where the new hole for the vanity will be cut. Outline the old sink and with or chalk, mark cutting lines on walls or floor depending on whether you want the cabinets installed right up to the floor line they need hanging from their hinges. Work out how much space there needs to be below for pipes and electric wiring, and use this as a cutting guideline if you are working on floors. Mark all four corners accurately so that cutting can be done precisely, creating a square opening to fit your vanity cabinet.
Step 3:
Drill holes around the marked area and insert screws with washers at each corner to secure a screwdriver while punching holes through. Punch through the screws and then screw holes to mark where plumbing pipes need to be cut. Cut the line by placing the screwdriver against it and hammering it through. If cutting into tiles, drill a 5/8 inch hole to insert the jigsaw blade and saw away. If there are no tiles, use a 1-1/4 inch spade bit to create holes for jigsaw blade cutouts. Make sure that behind the cutting spot is a 2X4 inch stud to screw the cabinets into.
Step 4:
The next thing is to cut out the drywall behind the sink with a jigsaw or circular saw. After that, remove the insulation and part of the drywall, attaching it to wall studs with a pry bar, or cut it away wholly using a jigsaw. Ensure that you leave at least one wall stud for supporting the new cabinets.

Step 5:
How to Remove a Vanity: After holes are cut, drywall is removed, and with all necessary hardware pre-installed on the vanity, it can be lowered into position perfectly vertically so as not to create any problems later. Ensure that the right size of vanity is bought so that it fits the cut-out hole. Make sure to leave enough space on all sides for doors to open and cabinet drawers to pull out easily. Use a level as a guide to making sure there are no crooked or uneven surfaces.
Step 6:
How to Install Vanity Cabinets: Install vanity cabinets involves sinking the supporting brackets on both ends of the mirror into walls or studs behind drywall with screws and washers. This is necessary for securing it tightly. Next is installing doors and drawer fronts using screws given with the vanity cabinet package. Usually, they are long screws to be driven through the frame and exits into the cabinet body. Install vanity cabinets is complete once all drawers are fitted with drawer fronts, doors are attached, and knobs or handles are securely fastened.
Step 7:
How to Install a Vanity: Installing a new sink involves the plumbing job of cutting the correct size hole to fit the sink, ensuring that it is large enough for a standard-sized drainpipe and new supply connection. Do not cut more than 1/8 inch on each side of measurements to avoid size issues when connecting pipes. If you are unsure how to do it, consult a professional or save yourself some money by buying an overflow kit with the faucet.
Step 8:
How to install bathroom fixtures: The last step is installing water supply lines and turning the water on after all connections have been made and secured tightly using pliers and an adjustable wrench. You can also buy braided stainless steel lines that look great, but they are expensive and not as durable as metal lines. Next, turn on the hot and cold water supply to check for leaks and tighten connections.

Step 9:
Once all fixtures are installed, you can turn your attention to walls; removing old caulking around the sink opening is a good idea before applying the new sealant to make it look like part of the whole renovation process. If you see open areas appearing after installation, don’t be afraid to give them another coat of caulk or fill in holes with spackle and paint over any rough spots. You now have a brand new-looking vanity along with a bathroom sink that will impress everyone who enters your home!
Precautions While Replacing a Pedestal Sink With Vanity:
A vanity can replace a pedestal sink with relatively little “do-it-yourself” experience. Replacing a pedestal sink is not complicated, but it does take some time and effort. When removing the old fixture, make sure to turn off the water supply to avoid damaging the new unit or creating an unsanitary environment. When working in close quarters like in a bathroom, follow all necessary safety precautions and use tools and materials that will not damage the surrounding surfaces.
Frequently Asked Questions
Question: Is Pedestal Sink Old Fashioned?
Today, many people are dissatisfied with pedestal sinks because they look “old-fashioned,” especially in a modern bathroom. Many families want to update their bathrooms and switch from a pedestal sink to a vanity, a modern even in older homes.
Conclusion
I hope this article has been beneficial for learning how to replace a pedestal sink with a vanity. Always ensure the steps discussed here are followed chronologically. Also, make sure the preventive measures are followed. Thank you for your time!
Check it out to learn- How to Remove Maynilad Water Meter Lock


