If your bathtub is leaking, you might think that the only solution is to replace it. But if the leak originates from a crack in the tub’s surface, there are a few things you can do before replacing your entire unit. One option is to use something like Plumbers Putty or Liquid Nails to seal up any cracks and create a tight bond between the underside of your bathtub and its surrounding surfaces.
If this doesn’t work, you might need to do simple repairs. If so, you will need to remove the overflow plate and pop any caulk around the bathtub’s drain. Now, there should be no screws holding in your old caulk.
Just pull it out with a utility knife or putty knife. Any leftover material should be scraped off with the same tool. So, this article is for you. You will learn how to seal a bathtub crack with just one simple trick!
Step to Follow on How to Seal a Bathtub Crack
Step One: Mark the Area
First, gather the tools needed, including gloves and a mask. Then, use a marker or soap to mark the crack in the tub. The best way to do this is by marking it on the outer edge of the bathtub, where water will have to travel to find its way into the crack.
It’s vitally important to measure the width of the crack before proceeding. When the crack is wide, use a putty knife or other thin blade to mark its length on the side of the tub. If the crack is long and deep, you might need to use a wire brush to remove any built-up dirt or mold inside the crevice.
If you have a fiberglass tub, you will need to remove the paint around the crack. This is quickly done with chemical strippers like Klean-Strip, available at most hardware stores. It’s also a good idea to use a primer, like Klean-Strip’s Max Bond, before you re-paint the area around the crack.
Step Two: Clean the Area
After you have marked the area and gathered your supplies, it’s time to clean the crack and the surrounding area. This is an important step, as any dirt or residue can interfere with the sealant. Use a wire brush to clean out any built-up dirt, and then use a household cleaner to remove any soap scum or mold.
If the crack is especially deep and large, you might want to use a wire brush and chemical-resistant gloves. You can then use a hand vacuum or blow dryer to remove sawdust from the tub. It’s also essential to ensure the area is arid before continuing.
If you have a fiberglass tub, you will need to remove the paint around the crack. This is quickly done with chemical strippers like Klean-Strip, available at most hardware stores. It’s also a good idea to use a primer, like Klean-Strip’s Max Bond, before you re-paint the area around the crack.
Step Three: Apply the Sealant
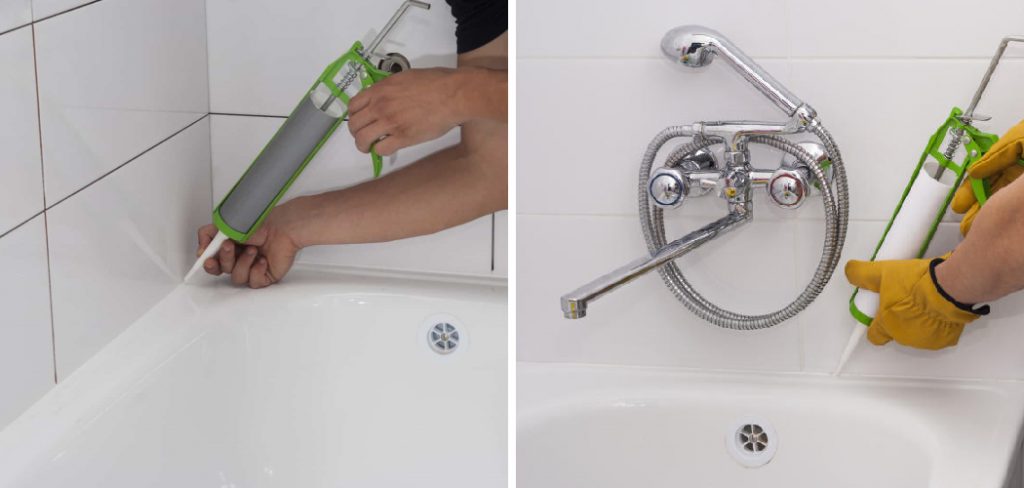
Now it’s time to apply the sealant. If you’re using a caulking gun, ensure the tip is clean and free of any dried sealant. Next, cut off the nozzle, so it’s flush with the tube of sealant. Hold the caulking gun at a 45-degree angle to the tub when squeezing out sealant.

Apply an even bead around the crack, then smooth it out using your finger or a putty knife. You can use your finger to push excess caulk back into the tube, so you don’t have to waste any. If the crack is extensive, you might want to use a backer rod before applying the sealant.
A backer rod is a piece of foam or plastic inserted into the crack before the sealant is applied. It helps fill in the space and create a smoother surface for the sealant. It’s important to remember that backer rods have specific widths for different-size cracks. This will help in how to seal a bathtub crack.
Step Four: Seal the Bathtub Crack
Now it’s time to smooth out the bead using your finger or a putty knife. You can use your finger to push excess caulk back into the tube, so you don’t have to waste any. If the crack is extensive, you might want to use a backer rod before applying the sealant.
A backer rod is a piece of foam or plastic inserted into the crack before the sealant is applied. It helps fill in the space and create a smoother surface for the sealant. It’s important to remember that backer rods have specific widths for different-size cracks.
If you’re using a standard tube of caulk, it’s possible to use more than one rod. Once you have smoothed out the bead, leave it alone for at least 24 hours before using the tub. This allows the sealant to dry completely and fully adhere to the tub’s surface.
You Can Check It Out to Fix a Cracked Bathtub Floor
Step Five: Maintain the Sealant
As soon as the sealant is applied, you can begin taking steps to maintain it. Always keep soap scum and other deposits from accumulating in the tub. After your bath or shower, wipe down the area with a clean cloth or sponge that has been dipped in bleach or vinegar.
You should also inspect the crack at least once a month and clean it with a wire brush as needed. If you notice that the crack has grown more substantial, call in a professional to take care of it for you. A damaged tub can be dangerous and is likely to leak over time.
Repairing cracks in the bathtub is an easy do-it-yourself project that can be done in a few hours. By following these simple steps, you can ensure that your tub is watertight and looks excellent. In addition, all of this information will help you learn how to seal a bathtub crack.
You can check it to Make Bathtub Non Slippery
What Are the Benefits of Sealing a Bathtub Crack?
When a bathtub is placed in the home, it often receives much heavy traffic. When that heavy traffic occurs over time, the bathtub can develop cracks and leaks along its seams. When this happens, it’s vital to seal off these cracks and leaks before water damage occurs.
If you’ve noticed any leaking around your tub or shower faucet, then the problem needs to be addressed right away. You can’t risk standing in water while you’re washing your hands or bathing. In addition, water damage is a very unsightly problem that can lead to health problems due to mold and mildew growth if not taken care of immediately.
If you have tile around your tub or walls near it, the sealant you use should match the color of the grout. This will help to camouflage the sealant and make it less noticeable. There are many benefits to sealing a bathtub crack. Not only does it prevent water damage and keep your home looking its best, but it can also help to extend the life of your tub or shower.
If you’re not sure how to seal a bathtub crack, many products on the market can do the job for you. You can also find helpful tutorials online to show you how to seal your tub correctly. It’s a relatively simple process, and it’s well worth the time and effort to do it right.
Frequently Asked Questions
What Can You Use to Seal a Crack in a Bathtub?
There are many things that can be used to seal a crack in a bathtub, but the most popular options include caulk, silicone, and fiberglass tape.
Caulk is a versatile product that can be used to seal any type of crack. It is a latex-based product that comes in a variety of colors and can be easily applied with a caulking gun or traditional brush. Silicone is another popular option for sealing cracks in bathtubs. It is a durable material that is resistant to water and chemicals, making it a good choice for areas such as the shower area where water may splash around. Fiberglass tape is another popular option for sealing cracks in bathtubs. It is made from fiberglass strands that are tightly bound together so they cannot stretch or move. This makes it an ideal choice for areas where movement or water exposure might be an issue.
Can You Caulk a Crack in a Tub?
Unfortunately, no. Caulking a crack in a tub will not fix the problem and may even make it worse. Instead, you should contact a professional to fix the issue.
Can a Crack in an Acrylic Bathtub Be Repaired?
Cracks in acrylic bathtubs can often be repaired, but it is important to get them professionally repaired as soon as possible, as water can seep in and damage the tub even further. If you are able to repair the crack yourself, be sure to use a sealant and coat the crack with a protective layer every few months to keep water from seeping in.
Can You Fix a Crack in a Fiberglass Tub?
While it’s not always possible to fix a crack in a fiberglass tub, there are many ways that you can repair or improve the condition. You may be able to seal and reseal the cracks using epoxy resin or silicone, depending on their size and severity. Additionally, you may be able to fill in the cracks with hot tar or caulk. If this is not feasible or desirable, then you can replace the entire tub liner.
Regardless of how you proceed, make sure that any repairs are done by an experienced professional because doing so incorrectly could lead to further damage and ultimately require replacement surgery.
Conclusion
Always use your bathtub’s overflow drain to let the water out when you’re done using it. Those cracks will get larger and more challenging to fix over time if you don’t. You can also seal a small sink or toilet bowl crack with caulk by running some water over the area while applying an even coat of caulking on top.
This should form a temporary repair until you have time for something more permanent. It’s always best to keep up with minor repairs, so they don’t become major problems later down the line! For example, sealing a bathtub crack is an essential step in preventing water damage to your home.
If the crack is enormous, you might want to use a wire brush and chemical-resistant gloves. However, sealing a bathtub crack is a reasonably straightforward process, and it’s well worth the time and effort to do it right. The conclusion paragraph is informative and provides information on how to seal a bathtub crack.
Check it out also – How to Keep Cat Out of Bathtub


