Cables are essential to the operation of a pool light. They carry power from an external transformer or breaker box, which is typically near the house. These cables extend underground and connect to the pool light fixture at some point along their path. A pool light’s cable is either aluminum or copper and must be buried in a conduit to protect it from the elements.
The cable carries electricity from the source to your light fixture so that it can be converted into usable light energy on demand by turning on your switch. Unfortunately, if these cables are not correctly sealed, they will eventually rust, and this corrosion will cause them to fail prematurely. Any moisture or oxygen that finds its way into your home’s electrical system will also cause rust to form. These are just a few of the problems that can be caused by faulty seals in your electrical cables.
This blog post provides instructions for sealing pool lights with PVC sealant. So, this article is for you. You will learn how to seal pool light cable with just one simple trick!
8 Steps to Follow on How to Seal Pool Light Cable
Step One: Preparation
The first step in this project is to prepare whatever materials are necessary. The main idea is to have all the materials available before starting, so they do not get forgotten about or misplaced during work at any particular stage. I like to put everything in a plastic box and label it so I know what is going on.
The first materials required are the pool light and the cable. Then all of the tools necessary to perform each task can be together. Once the materials and tools have been gathered, prepare for the jobs ahead with a clear mind and a work area with enough room to maneuver around. Next is to determine the distance from the pool light to the house where power will be pulled from. It is important to know how long the cable that will be used will need to be. Then the cable can be cut to the appropriate length.
Step Two: Ripping Open the Housing
The housing of the pool light must be open to reaching the cable inside. Once this is accomplished, the light can be removed from its position within the body of water and taken out of its enclosure. This will be conducted by using a flathead screwdriver to pry open the two halves of the housing.
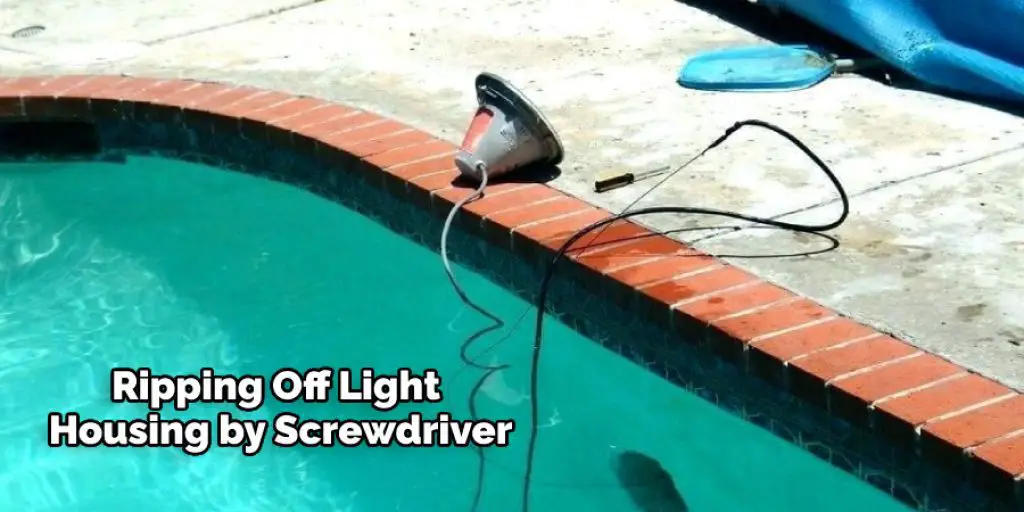
The screwdriver should be placed between the seam of each side’s lip and used to wedge them apart with some force until they come apart. It may take a few tries, but it will work without too much effort with enough pressure. A light tug on the cord will help to remove it from the enclosure as well. Once the case is removed, you will be able to see the metal shield that covers the circuitry. You will need to remove it by unclipping the tab that is holding it in place.
Step Three: Removing Cable Connections
The next step is to remove each connection from both ends of the cable. This can be done by using a flathead screwdriver to pry apart each connector, just like the housing. When taking apart each connection, it may not be immediately clear which side is positive and negative.
However, most electrical connections are marked on both sides with small triangles pointing toward the wire that should be attached to the positive side of the battery. Therefore, the positive side will have an easily seen white strip running down the wire, while the negative may only show a small silver or copper trace along its length.
Step Four: Cutting the Cord
The next step in the process is to cut the cord. This will be done using a utility knife to make a series of cuts around half an inch apart and then tearing it down the middle until the two halves separate. When cutting, it is essential to make sure that all four wires are separated before continuing.
One method to accomplish this is by making single, vertical cuts down the cord until they are close enough to one another to be pulled apart with a slight tug on each wire. When cutting, care must be taken to cut the insulating sheathing and not any of the wires inside.
Step Five: Separating Cable Ties
At this point in the process, each wire should be separated and no longer held together by a bundle or cables ties. If there are any cables ties used, they will need to be cut apart. This can be done by using a pair of wire cutters or side cutters.
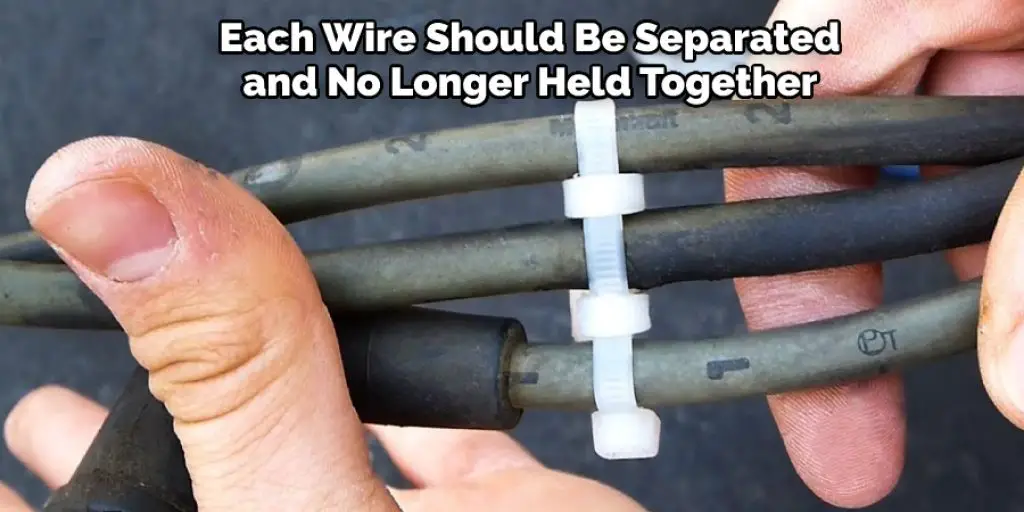
Once the ties are cut, they can be easily pulled apart until they are no longer wrapped around the set of wires. At this point, it is essential to organize each wire so that there are no crossed wires when they are reattached.
Step Six: Soldering Wires
If there were no soldering done in the previous step, it would now be necessary to solder each wire to its corresponding connector. This can be done by applying a small amount of flux to either side of the wire and then placing the tip of the iron on top of both sides at once.
While the iron is still in place, the solder should be touched to its tip so that it melts and covers both wires. When ready, give each wire a few seconds or so to complete this step before continuing along. Soldering will help ensure a good electrical connection between each connection piece.
Step Seven: Putting It Back Together
After the soldering is done, each wire should be placed back inside its cable ties and then re-tightened around one another. When tightening the cable ties, it is essential to ensure that they are not too loose or too tight.
A good method for doing this is to make them as tight as possible without putting too much pressure on the wires inside of them. If they are not tightened down enough, there is a chance that water may seep through and damage the electrical connections.
Step Eight: Reinstalling in Enclosure
The last step in this process is to reinstall each cable back into its housing. This can be done by first inserting the white wire into one half of the housing, followed by the black wire on the opposite side.

Then, each red and green wire should be inserted into their respective halves before screwing both halves back together again with a flat head screwdriver. Now that you have read this article, you know how to seal pool light cable! Enjoy your new appliance.
Frequently Asked Questions
Can a Pool Light Electrocute You?
Yes. A pool light can electrocute you if it’s left on and submerged in water. A pool light can electrocute you if it is left on and submerged in water. The electricity can be conducted through the water to your body, which could cause a shock or an electric current that could lead to death.
Does a Pool Light Need to Be Bonded?
No, a pool light does not need to be bonded. You should only consider bonding your pool light if you have multiple pool lights or want to reduce the chance of one being blown out by lightning.
How Do You Fix a Leaky Pool Light Cable?
To fix a leaky pool light cable, you need to disconnect the power cord and then remove the cover of the light fixture. Once this is done, you can find the defective wire by unplugging one wire from each terminal. Now You Need to Connect a New Wire in Its Place by Following These Steps :
- Take one of the wires from each terminal and twist them together tightly.
- Connect this twisted pair to a fresh piece of wire that has been cut about an inch long with a clip on one end. Clip this piece of wire into one side of the terminal on top of the twisted pair.
- Connect another short piece of wire to the other side of that same terminal and clip it into place as well before connecting it back to the power supply.
Conclusion
If you want to prevent corrosion of your pool light cable, seal the end with PVC or silicone. These are two materials that will protect your equipment and keep it in good condition for years to come. In addition, we suggest sealing the connector at both ends before inserting it into a junction box.
This article has provided all of the information you need to know about buying and installing pool lights, so feel free to contact us if you have any additional questions! We hope you enjoyed this article on how to seal pool light cables.
Chet it out to learn – What Are Some Effective Methods for Cleaning your Home’s Pool?


