Generators can be a lifesaver in an emergency, but if you don’t have the right cord, you might not be able to use them. Making your own generator cord is a great way to save money and be prepared for a power outage. This blog post will teach you how to make a generator cord that is long enough to reach where you need it. You’ll need some basic supplies and a little bit of know-how, but this project is easy enough for anyone to do. So get ready to be prepared for the next power outage.
Knowing how to make a generator cord can come in handy in various situations. Whether you need to power some essential appliances during a power outage or want to be able to use your generator for camping, learning how to make your cord is a valuable skill. This tutorial will show you the steps needed to create a safe and reliable generator cord.
What Wire Is Used for Generator Cords?
The wire used for generator cords is typically stranded copper, which is more flexible than solid copper and less likely to break. The insulation on the wires is also important, as it needs to withstand high temperatures and be resistant to oil and other chemicals that may be present in the generator’s environment.
When choosing wire for your generator cord, it is important to pay attention to the gauge (thickness) of the wire. The thicker the wire, the more electricity it can handle without overheating. A good rule of thumb is to use 14-gauge wire for cords up to 50 feet long, 12-gauge wire for cords up to 100 feet long, and 10-gauge wire for longer cords. If you are not sure what gauge wire to use, it is always better to err on the side of too thick rather than too thin.

Once you have chosen the appropriate wire for your generator cord, you will need to purchase a plug and receptacle that match your generator’s voltage and amperage rating. These can be found at most hardware stores.
What Are the Benefits of Using a Generator Cord?
There are several benefits of using a generator cord over other types of electrical cords. One benefit is that generator cords can be used with multiple types of generators, making them very versatile. Another benefit is that they are much more durable than other types of electrical cords and can withstand heavy use. Finally, generator cords are typically much cheaper than other types of electrical cords, making them a great option for those on a budget.
If you are looking for an easy way to connect your generator to your home or business, then a generator cord is the way to go. Generator cords come in a variety of sizes and styles, so you should have no trouble finding one that meets your needs. In most cases, all you will need to do is plug the cord into your generator and then into the outlet on your wall. It is really that simple!
If you are worried about safety, then you should know that generator cords are very safe to use. They are made with thick, heavy-duty insulation that prevents electric shock. Additionally, most generator cords have built-in circuit breakers that will trip if the cord becomes overloaded, preventing any damage to your electrical system.
Types of Generator Cord:
There are two types of generator cords: one that connects the generator to a power outlet and one that connects the generator directly to your appliances. The cord that connects the generator to a power outlet is usually longer, so it can reach from the generator to the nearest outlet. The appliance cord is shorter and has special plugs that fit into the outlets on your appliances.
Things you will need:
To Make a Generator Cord, You Will Need:
- A length of electrical wire
- Wire cutters
- A power outlet or appliance with the appropriate outlet for your cord
- Electrical tape
- A voltage tester (optional)
How to Make a Generator Cord – Step by Step Guide:
Step 1. Cut Your Cable to Length.
Using your sharp knife, cut your chosen cable or wire to the desired length plus an extra 3 inches. This will give you enough room to work with when connecting your generator cord. Next, use your wire strippers to remove about 1 inch of the insulation from each end of the cable. Be sure not to cut into the individual wires inside the cable!
Now would be a good time to test-fit your new generator cord. First, make sure that the cord is long enough to reach your generator to the desired outlet and that the stripped ends of the wires will be able to reach the terminal screws on both the generator and the outlets. If everything looks good, go ahead and proceed to the next step.
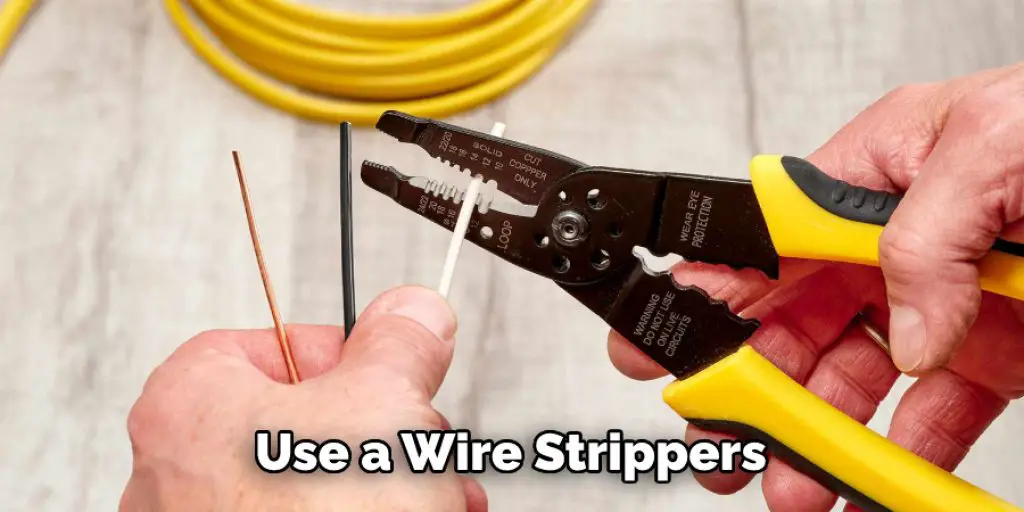
Step 2. Strip the Insulation Off the Wires.
Using your wire strippers, carefully remove about 1 inch of insulation from each end of the wires. Be careful not to damage the wires themselves. If your wire strippers have a gauge, use the appropriate size for the wires you’re working with. If not, strip about 1/8 inch of insulation off each wire.
Once the insulation is removed, twist the ends of the wires together. Make sure the wires are twisted tightly together.
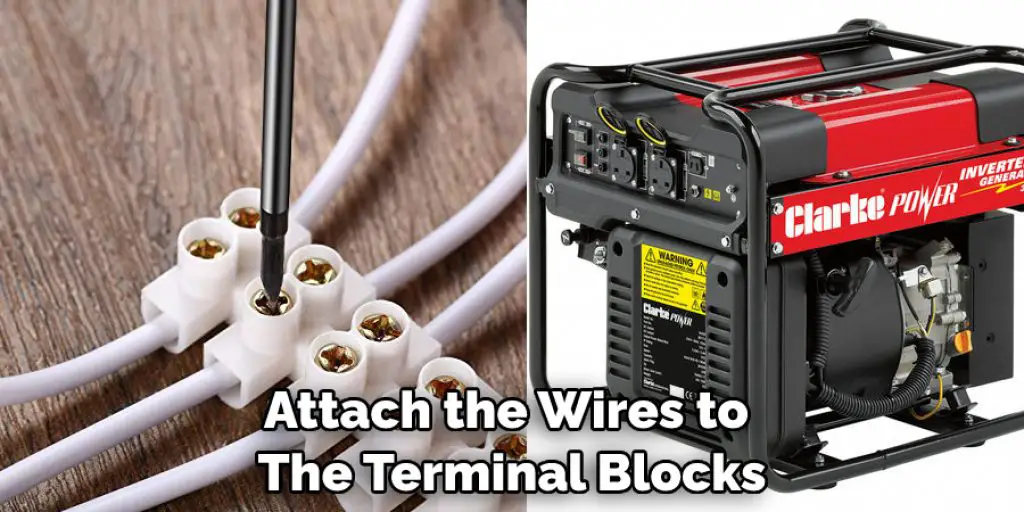
Step 3. Attach the Wires to the Terminal Blocks.
Now it’s time to start connecting things together. Take one of the stripped wires and insert it into one of the terminal blocks. Use your screwdriver to tighten the screw on the terminal block. This will ensure a good connection between the wire and the block. Repeat this process for the other wire, attaching it to the other terminal block.
Now take the third wire and attach it to one of the grounds (GND) terminals. Again, use your screwdriver to tighten the screw. Next, attach the fourth and final wire to the other GND terminal. Tighten all four screws securely.
Step 4. Connect the Generator Plug to the Extension Cord Plug.
You’ll need to take the generator plug and connect it to the extension cord plug. Make sure that you do this carefully to secure the connection, and it won’t come undone easily. Once you have the two plugs connected, you should be able to start using your generator with ease!
First, you’ll need to gather up your supplies. You’ll need an extension cord, a generator plug, and a pair of pliers. Once you have these items, you’ll be ready to get started.
The first step is to take the extension cord and cut off one of the ends. You’ll want to make sure that you leave enough cord so that you can easily connect it to the generator plug.
Next, you’ll need to strip away the insulation from the end of the extension cord. Again, be careful not to damage any of the wires inside. Once you have the insulation removed, you should see three different wires.
Now you’ll need to take the generator plug and connect it to the extension cord plug. Again, make sure that you do this carefully to secure the connection.
Step 5. Connect the Ground Wires.
Now you’ll need to take the ground wires and connect them together. Again, make sure that the connection is secure and won’t come undone easily. Once you’ve done that, wrap the area where the wires are joined together with electrical tape. This will help to keep the connection secure and prevent any accidental shocks.
Now you should have a functioning generator cord! If you need to use it for an extended period of time, make sure to check the connections regularly to ensure that they’re still secure and there is no risk of shock.
Step 6. Connect the Neutral Wires.
The next step is to connect the neutral wires together. Like with the ground wires, you’ll want to ensure that the connection is secure and won’t come undone easily. Once the neutral wires are connected, you can move on to the live wires.
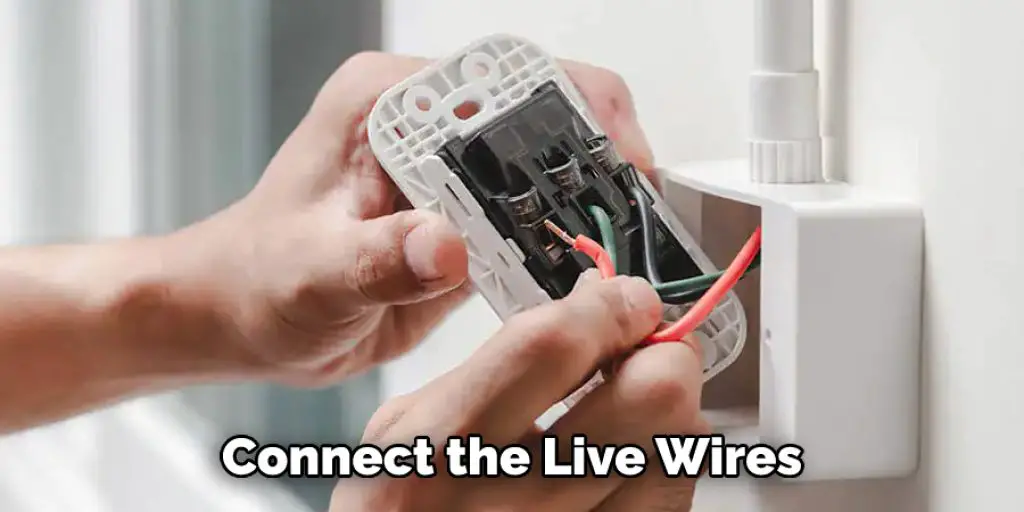
Step 7. Connect the Live Wires.
Now it’s time to connect the live wires together. First, make sure that the connection is tight and secure, then wrap the area where the wires are joined together with electrical tape. It will help keep the connection from coming undone and prevent any accidental shocks.
Your generator cord is now complete! Be sure to test it before using it to make sure that everything is connected properly and there is no risk of shock. If you need to use it for an extended period of time, make sure to check all of the connections regularly to ensure that they’re still secure.
Conclusion
A generator cord is a type of electrical cable that is used to connect a portable generator to an electrical load. It has a male plug on one end and a female connector on the other. This blog post aims to show you how to make a generator cord. If you have an old extension cord or some spare wire, you can make your generator cord for just a few dollars.
You can check it out to Use a Generator in an Apartment


