A buck and rail fence is an old-fashioned fence that can mark boundaries, define property lines, or corral livestock. It’s easy to build and relatively inexpensive, making it a popular choice for homeowners and farmers. This article will show you how to build a buck and rail fence. Let’s get started!
Fences are an essential part of any property. They can mark boundaries, keep animals in or out, and provide privacy. Consider building a buck and rail fence if you’re looking for an easy and affordable way to build a fence. Most importantly, buck and rail fences are attractive and can add to your home’s curb appeal. As a result, many homeowners choose to build them as a border around their property. Buck and rail fences are also popular with farmers. They can be used to corral livestock or mark boundaries between fields.
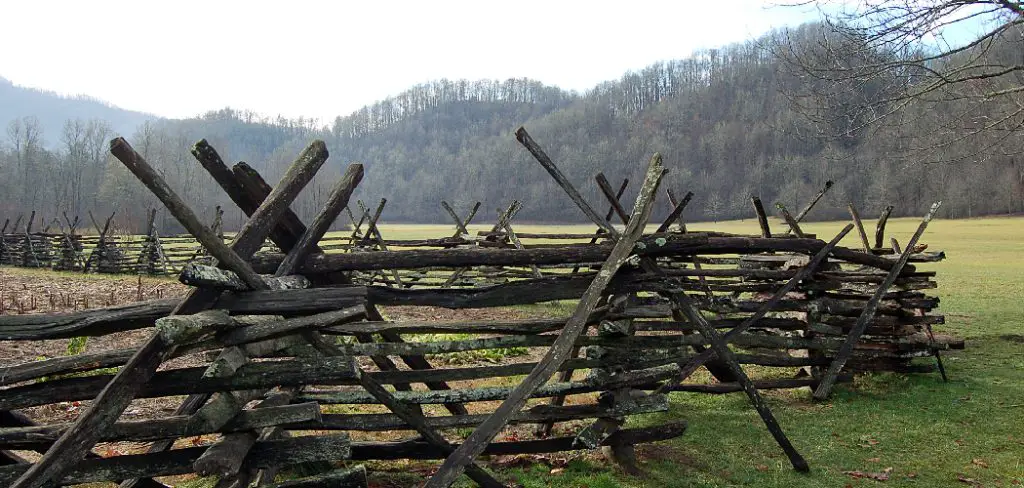
What Is a Buck and Rail Fence?
A buck and rail fence is a type of fence that has two horizontal pieces (the “buck”) on top of vertical posts (the “rail”). The buck and rail are usually made of wood, but they can also be metal or plastic.
The spacing between the rails and the posts can vary, but it is typically between 4 and 6 inches. The rails are generally longer than the posts to extend beyond the posts at the ends. The size of the rails and posts will depend on the desired look of the fence.
Buck and rail fences are often used for fencing in yards, gardens, or other areas that need to be enclosed. They can also be used to create a decorative border around an area.
What You’ll Need
- Posts: these should be around 8 feet long and 6 inches in diameter.
- Rails: these should be around 10 feet long and 4 inches in width. You’ll need around 16 rails for a 100-foot fence.
- Nails or screws: you’ll need around 2 pounds of nails or screws per rail.
- Hammer: to drive in the nails or screws.
- Tape measure: to measure the posts and rails.
- 80D Spike: to dig the post holes
- Wire cutters: to trim the wire fencing
- Level: to make sure your fence is level
- String line: to keep your posts in a straight line
A Stepwise Guide on How to Build a Buck and Rail Fence
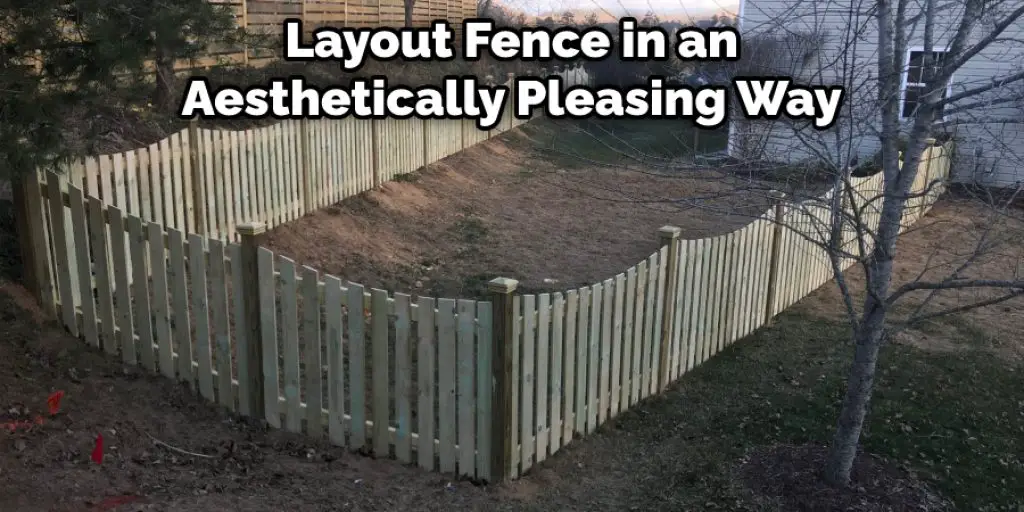
Step 1: Determine Layout
Since a buck and rail fence is mainly used for decorative purposes, it’s essential to take the time to layout your fence in an aesthetically pleasing way. To do this, use either string or surveyor’s tape to mark the perimeter of your fence. Once your perimeter is marked, use a stake and hammer to drive stakes into the ground at regular intervals along the line. The number of stakes you’ll need will depend on the length of your fence.
Step 2: Cut Rails
Once your perimeter is marked, and stakes are driven in, it’s time to cut your rails. Rails are the horizontal pieces that connect the vertical posts of your fence. How many rails you’ll need will depend on the height of your bar and the spacing between your posts. You’ll want the rails to be around 4 inches wide for a buck and rail fence. Use a saw or circular saw to cut the rails to the desired length to cut them.
Step 3: Set a Post
Once you have your rails cut, it’s time to set a post. This is where you’ll need your hammer and nails or screws. First, use your tape measure to determine how far your posts should be spaced. Then, using your stakes as guides, mark the spot where each post will go. Next, dig a hole at each spot around 2 feet deep and 1 foot in diameter. Once the hole is dug, set the post and fill the gaps with concrete. Allow the concrete to set for at least 24 hours before moving on to the next step.
Step 4: Set an 80D spike into the top post
To set the 80D spike, you will need a hammer and a level. First, you will need to drill a hole in the top of your post that is around one inch in diameter. Once the hole is drilled, you will need to ensure that the spike is straight up and down by using the level. Once the spike is in the correct position, you will need to tap it into the hole until it is firmly in place.
Step 5: Construct another A-frame
Once your top post is in place, it’s time to construct the A-frame. This will be the frame that the rails will connect to. To make the A-frame, use two of your rails and place them so that they are perpendicular to each other and form an “A” shape. Then, using nails or screws, attach the rails to each post. Make sure the frame is level before moving on to the next step.
Step 6: Stand the A-frames up
Once the A-frames are attached to the posts, it’s time to stand them up. First, lift one end of the frame and set it on top of the post. Then, using your level, make sure the frame is level before attaching it to the post with nails or screws. Repeat this process for the other side of the fence. This is a crucial step in building a buck and rail fence.
Step 7: Place another pole in the ground
After the A-frames are in place, you’ll need to place another pole in the ground. This pole will be used to support the middle of the fence. To do this, first, dig a hole around 2 feet deep and 1 foot in diameter. Then, using your level, make sure the pole is straight up and down before attaching it to the posts with nails or screws.
Step 8: Place the remaining pole across the top
The last step is to place the remaining pole across the top of the fence. First, measure the distance between the two posts and cut the pole to size. Then, using your level, make sure the pole is level before attaching it to the posts with nails or screws.
Step 9: Cut and Attach the Wire Fencing
The next step is to cut and attach the wire fencing. You’ll need a pair of wire cutters and some wire fencing to do this. First, use your tape measure to determine how much fencing you’ll need. Then, using your wire cutters, cut the fencing to size. Once it’s cut, use your level to make sure it’s straight. Next, attach the fencing to the posts with staples or nails. Keep the fencing tight against the posts so that animals can’t get through.
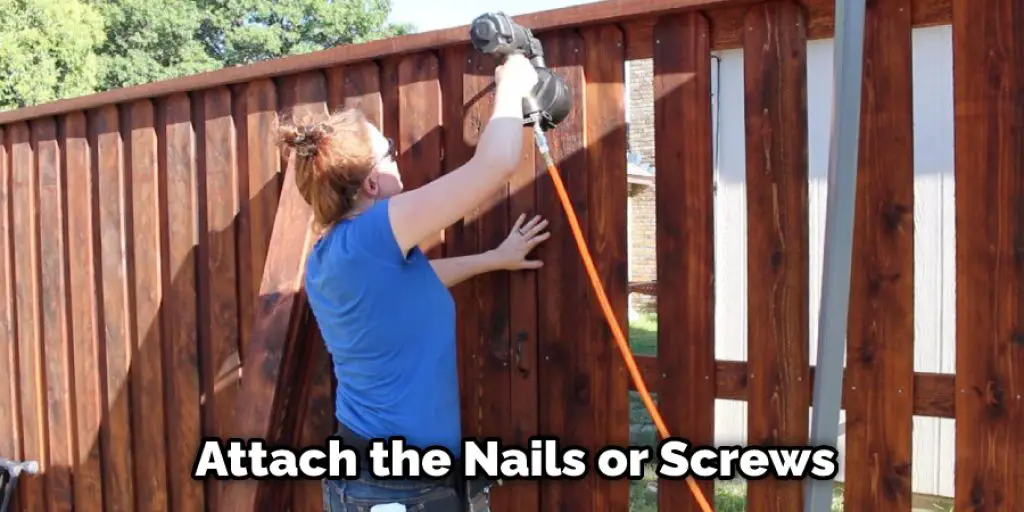
Step 10: Attach the Rails
The last step is to attach the rails to the fence. To do this, you’ll need nails or screws and a drill. First, measure the distance between the posts and cut the rails to size. Then, using your drill, make pilot holes in the rails. Next, attach the rails to the posts with nails or screws. Make sure that the rails are level and evenly spaced before moving on to the next step.
Step 11: Attach the Pickets
The final step is to attach the pickets to the fence. To do this, you’ll need nails or screws and a drill. First, measure the distance between the posts and cut the pickets to size. Then, using your drill, make pilot holes in the pickets. Next, attach the pickets to the rails with nails or screws. Make sure that the pickets are level and evenly spaced before moving on to the next step.

Step 12: Add a cap to the top of the fence
The last step is to add a cap to the top of the fence. This will help keep water from seeping into the posts and causing them to rot. To do this, nail or screw a piece of wood to the top of each post. You can also use a pre-made fence cap for this step.
Conclusion
This is the perfect article to learn how to build a buck and rail fence. We’ve outlined all the steps necessary to make your project successful, from gathering materials to attaching the rails. So get out there and start building!


