How to Install a Dometic Rv Air Conditioner
One of the most common questions RVers have is how to install a Dometic rv air conditioner. Installing a new or replacement RV air conditioner is not as complicated as you might think. This post will help you by walking through the process step-by-step and answering some of your questions about what to expect from your installation.

First, let’s start with what type of air conditioner to install in an RV. There are two different types: window units and rooftop units. Window units are typically cheaper but take up more space inside the RV because they have to be installed near a window or door for ventilation purposes.
Rooftop units can easily be mounted on the outside of the RV, so they don’t take up valuable interior space but cost more than window models. Both options require installing brackets that attach to the RV frame.
6 Steps to Follow on How to Install a Dometic Rv Air Conditioner
Step One: Locate the Dometic Rv Air Conditioner
The first thing to do is find your air conditioning unit. It should be located where it’s easily accessible for future use. Another reason you want to locate it is so that you do not have issues trying to get into tight spaces or having enough room for tools later on.

The location should be in a place where there are not many obstructions like overhangs or large objects blocking the airflow. Once you have found an appropriate place to install your Dometic Rv Air Conditioner, then move on to step two below; it is responsible for assembling the frame of the air conditioner.
Step Two: Assemble Your Unit’s Frame
To assemble your unit’s frame, make sure that you are in a well-ventilated area. If you are not, you can open up a window. You will need to have your Dometic Rv Air Conditioner’s frame, screws or bolts, washers, nuts, and plastic bag. Before assembling the air conditioner frame, place both pieces on the ground and make sure you identify which side is up.
Then, attach screws or bolts to the holes using a screwdriver or wrenches. Now, place one washer on each bolt before placing them in their corresponding holes. After this step, place your Dometic Rv Air Conditioner’s frame face down and make sure you line it up to how you want it positioned. Then, place another washer on each of the bolts you placed in their holes earlier. This will help in how to install a Dometic rv air conditioner.
Step Three: Make the Drainage Holes
In this step, you will need a drill and a drill bit. You can use whatever size drill bit is appropriate for your Dometic Rv Air Conditioner and any other equipment that might be attached to it. After you have found what size drill bit to use, take measurements. Then, mark where the drainage holes need to go. You will also want to make sure that you have a drill bit that is slightly smaller than your bolts, which you can use to drill a hole through your Dometic Rv Air Conditioner’s frame.
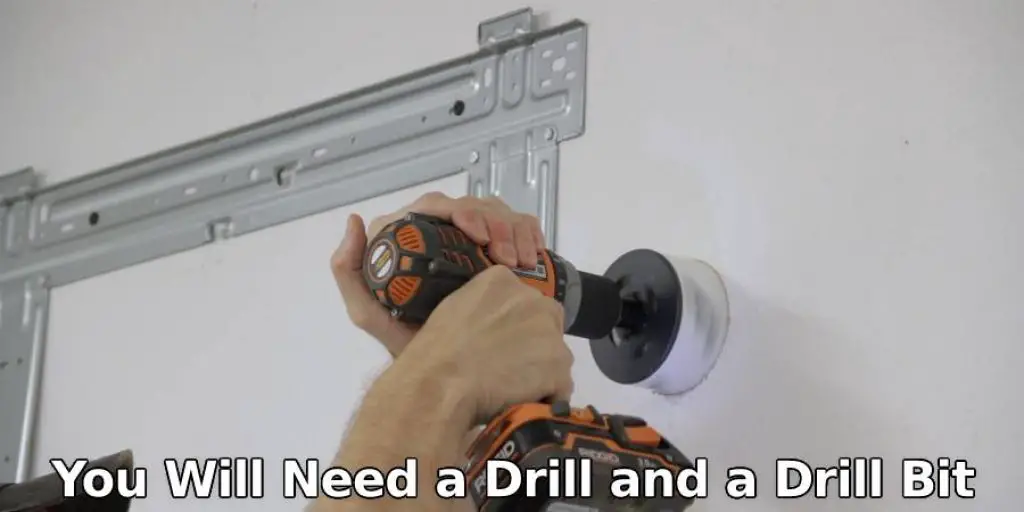
Afterward, position the holes where you marked them and start drilling from there. You will want to make sure to drill slowly and let the drill bit do its work. If you try to push too hard, you might break your Dometic Rv Air Conditioner’s frame and damage other parts of your air conditioner. Step four will tell you how to attach a hose and tubing so that water can easily drain from the Dometic Rv Air Conditioner.
Step Four: Attach Hoses and Tubing to Your Dometic Rv Air Conditioner
To attach water hoses to your Dometic Rv Air Conditioner, first, you need to cut a hole on the side of the air conditioner for where the hose will enter. You can measure how big it needs to be by placing your hose at the hole and marking where it needs to go on the Dometic Rv Air Conditioner’s frame.
Then, use a drill bit that is slightly smaller than the size of your bolt head. Next, drill into the side of your Dometic Rv Air Conditioner, which you want to attach to an end of your hose. Now that you have two holes drilled out on the side of your Dometic Rv Air Conditioner place a washer and nut on each hole along with a plastic bag placed around each one inside the unit.
Step Five: Connect the Water Hoses to Your Unit’s Frame
First, you will need to place your hose into the unit through the hole you drilled out. Once it is inside, attach it with nuts and washers on each end of the hoses. Now that this task has been completed tighten them down with wrenches or pliers until they are nice and firm.
You will need to repeat the same process on the other side of your Dometic Rv Air Conditioner, except in step four, you only need to drill out one hole instead of two. Now that both ends of each hose are attached to each side of your Dometic Rv Air Conditioner’s frame, it is time to place the free end of one hose into a drain or outside. Once you have done that, tighten it down with your wrench or pliers.
Step Six: Connect Your Dometic Rv Air Conditioner
Now, your Dometic Rv Air Conditioner should be all set. You can use it as much as you want now that the installation process is complete, but make sure to drain and flush it often so that you do not get a lot of mold and mildew growing inside the unit. If you do not want to drain and flush it yourself, you can hire a professional to do this task for you.
Suppose you want more information on how to install a Dometic Rv Air Conditioner. In that case, there are many resources available to help, such as: Visit the following blog post that will give you some important facts and info about RV air conditioners.
Can I Add an Ac Unit to My Rv?
So, you want to know if there is a way to add an ac unit to your RV? The answer is yes and no. You can add an air conditioner in different ways. Some of the factors that affect this question are: how great the need for cooling is (some people do not like to sleep when it’s too cold), how much space you have in your RV, and where you want to add the unit.
There are three main ways to add an ac unit: through a window, through a porthole, or under chassis installation. In a window installation, the unit is installed in one of your windows. This type of installation may be completed by yourself if you are handy with tools. You will need to cut a hole in the exterior wall of your RV, remove the window from the opening, install some type of frame for support, and fix it back into place along with the air conditioner.
You Can Check It Out to: What to Consider When Installing AC Systems?
Frequently Asked Questions
Can I Run My Rv Ac All Day?
If you are running your RV AC all day, it is essential to keep in mind that this will cause your battery to drain and create excess heat, which can damage the engine. Therefore, switching off the RV AC when not in use is better.
Can You Run an Rv Air Conditioner Off an Inverter?
You can run an RV air conditioner off an inverter, but it is not recommended because it may cause over-voltage in the battery and make your battery charge too slowly.
An inverter converts direct current (DC) to alternating current (AC). It allows you to plug a 12-volt DC power source into a 120-volt AC outlet, or vice versa.
When using the AC from your RV’s air conditioner, it is necessary to use two circuits with the same voltage for proper cooling.
Can I Run My Ac on Solar Power?
Yes, you can. If you have a pool or can install solar panels on your roof, it is possible to use the sun’s energy to power your AC unit.
However, be aware that this method may not work and other alternatives.
One reason why it might not work is that the sun doesn’t always shine, and solar panels need direct sunlight to generate electricity. The other issue with this method is that there will still be an electrical bill that needs to be paid every month even if you are using the sun’s energy.
Conclusion
There you have it, from start to finish. Installing a Dometic RV air conditioner is not as hard as it may seem at first glance but does require patience and the willingness to plan ahead for any obstacles that could arise along the way. If your home or business has an existing duct system in place, this installation should be fairly straightforward and quick enough for one person to take on alone.
For those who lack a suitable ducting setup already in place, we recommend having a professional come out and give their opinion before making any decisions about where best to install the unit. The end result of installing a new air conditioner will make all that time spent worth it! You’ll never want to go back inside a hot RV again. The article has been a good guide on how to install a Dometic rv air conditioner.
You may also like – How to install a return air vent in wall.


